

How to Insulate Draughty Period Windows: A 2026 Guide
Table of Contents
Why Draughty Period Windows Lose So Much Heat
Step 1: Diagnose Where the Cold Air Is Getting In
Testing Sash Windows vs Casement Windows
Step 2: Draught-Proofing Sash Windows
Sealing Meeting Rails and Sliding Channels
Step 3: Sealing Casement Window Frames and Opening Edges
Step 4: Choosing the Right Seal for the Gap
Step 5: Secondary Glazing for Period Windows
Types of Secondary Glazing
Performance, Durability and Reversibility
The Trade-offs
How It Compares With Other Measures
Step 6: Window Insulation Film for Old Windows
Step 7: Internal Shutters for Insulation and Comfort
What Most Guides Get Wrong
Frequently Asked Questions
Last Updated: October 5, 2026
Why Draughty Period Windows Lose So Much Heat
Old timber sash windows and casement windows were never built to be airtight. They were built to breathe.
Period windows lose heat in three main ways. According to Historic England's guidance on windows and energy efficiency, repairing and upgrading original windows is usually the better route for older properties than wholesale replacement.
At Caledonia Shutters, we work on period properties every week, and the pattern is always the same. The gaps you can see are rarely the worst ones.
Key Takeaway Stop the draught, keep the ventilation. A period window that is sealed completely airtight will cause condensation, damp and rotting timber within a season or two.
Step 1: Diagnose Where the Cold Air Is Getting In
Find the leaks before you buy a single strip of seal. Most people guess, seal the wrong spot, and wonder why the room still feels cold.
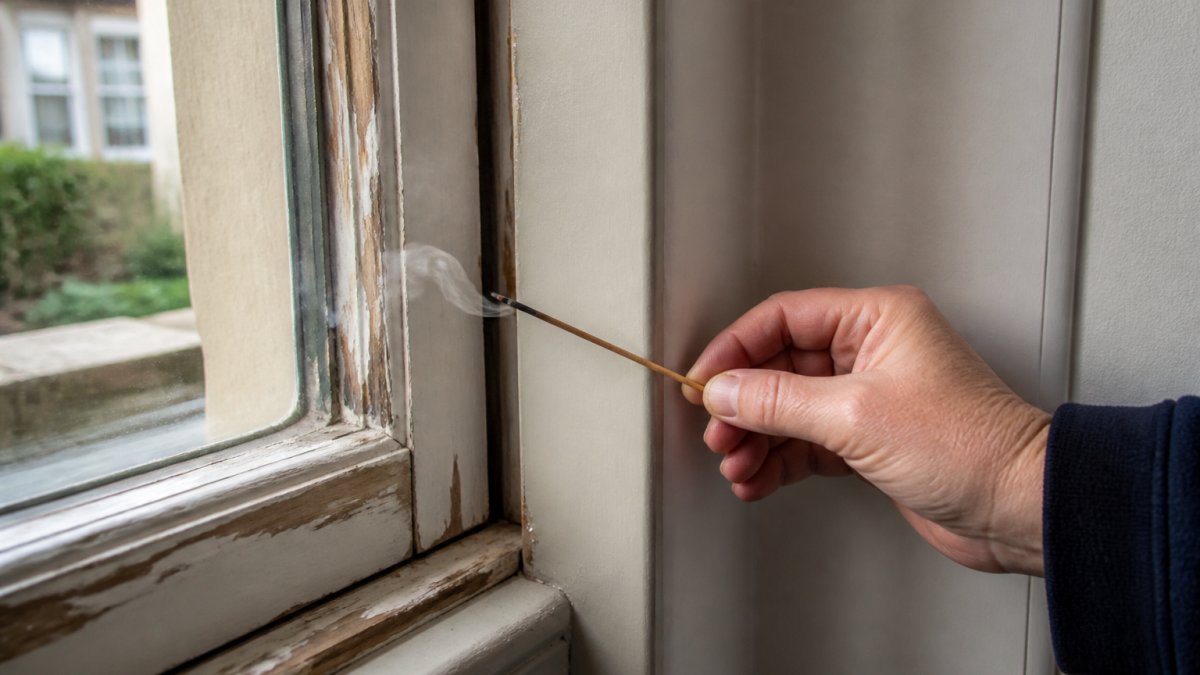
Work around each window on a cold, windy day and check these points in order:
The gap between the frame and the wall (the perimeter gap)
The meeting rail, where the two sashes overlap in the middle
The sliding channels on either side of a sash window
The opening edge of a casement window, where it meets the frame
The base of the frame, where it meets the sill
A lit incense stick or a candle is the simplest test. Hold it near a joint and watch the smoke. If it pulls sideways, you have found a leak. Do this on a windy day for the clearest results.
Testing Sash Windows vs Casement Windows
Sash windows slide up and down, so they leak at the meeting rail and along the vertical channels. Casement windows swing open on hinges, so they leak around the opening edge and the hinges themselves.
Test both types the same way, but expect different answers. A sash window usually needs work in the middle and the sides. A casement usually needs work all the way around the opening edge.
Step 2: Draught-Proofing Sash Windows
Sash windows are the hardest to seal and the most rewarding when you get it right. The trick is to seal the gaps without stopping the sash from sliding.
Start with the perimeter. Any gap between the frame and the plaster is fixed, so fill it with a flexible sealant rather than a strip.
Then deal with the moving parts. This is where brush seals and compression seals do the work.
Sealing Meeting Rails and Sliding Channels
The meeting rail is where the top and bottom sashes overlap. It is the single biggest source of draught in most sash windows.
Brush seals are the standard fix here. They are thin, flexible strips of bristle that sit in a carrier and press against the moving sash.
For the sliding channels, use a brush seal or a specialist parting bead seal. Do not use foam here. Foam will jam the sash and stop it moving.
Watch Out Never pack foam into the sliding channels of a sash window. The sash will stick, the cords will strain, and you will end up forcing the window open and cracking the frame.
Step 3: Sealing Casement Window Frames and Opening Edges
Casement windows are easier. The whole opening edge is a single, straight run, so a compression seal does most of the work.
Clean the frame first. Old paint, grit and flaking timber stop any seal from sticking properly. Sand back to bare, dry timber and let it dry fully before you start.
Run a compression seal along the rebate, the flat surface the window closes against. When the casement shuts, it presses into the seal and closes the gap.
Step 4: Choosing the Right Seal for the Gap
Match the seal to the gap, not to the price tag. The wrong seal either fails in a season or stops the window working.
Seal Type | Best For | Durability | Reversible? |
Brush seal | Sash meeting rails, sliding channels | Good, wears over time | Yes |
Compression seal | Casement opening edges | Very good | Yes |
Foam strip | Fixed perimeter gaps only | Fair, compresses flat | Yes |
Caulk or sealant | Gaps that never move | Excellent | Harder to reverse |
Self-adhesive strip | Quick fixes on flat surfaces | Fair | Yes |
A few rules that save a lot of wasted effort:
Use brush or compression seals on anything that moves
Use caulk only on gaps that never move
Use self-adhesive strips only on clean, flat, dry surfaces
Avoid foam on moving joints
For listed buildings and conservation areas, always choose reversible options. Historic England's advice on listed building consent is clear that alterations to a listed building need consent, and seals that can be removed without damage are far safer.
Step 5: Secondary Glazing for Period Windows
Secondary glazing is a second pane fitted inside the existing window, leaving the original frame untouched.
It works by creating a sealed air cavity between the original glass and the new pane. That cavity slows heat loss and, just as importantly, stops the cold draught that comes off the inside face of single glazing. It also cuts noise noticeably, which matters on a street-facing window.
Types of Secondary Glazing
There are three main approaches, and the right one depends on how you use the window:
Fixed panels, the cheapest and most thermally effective, but you lose the ability to open that window. Best for a window you never open, or one where ventilation is provided elsewhere in the room.
Sliding panels, two or more panes that slide past each other horizontally. Good for casement windows and for windows you open in summer. They take up less depth than hinged units.
Hinged or lift-out panels, the panel opens like a small door or lifts out entirely. The most flexible option, and the easiest to clean, but the most expensive and the bulkiest on the reveal.
Most period-property specialists fit slim aluminium-framed units with a low-profile profile, because they take up less of the reveal than timber or uPVC alternatives. The frame colour can be matched to the existing window so the unit reads as part of the joinery rather than an add-on.
Performance, Durability and Reversibility
A well-fitted secondary glazing unit with a 20 mm to 100 mm air gap performs in a similar range to a modern double-glazed unit, and considerably better than a single pane.
Durability is good. The units themselves last decades, and the seals and hinges are the parts that wear. Reversibility is excellent: a secondary glazing unit is screwed or fixed to the reveal, not the original window, so it can be removed later without damaging the historic fabric.
The Trade-offs
Bulk. A secondary glazing panel takes up space on the reveal. On a deep stone sill it can look clumsy, and on a narrow reveal it can foul the curtain track or the shutter.
Access. If you want to keep using the window, you need an openable unit, which costs more and seals less well than a fixed one.
Ventilation. Sealing a window with secondary glazing reduces background ventilation. If the room has no trickle vent, no chimney and no other opening window, you may need to add a controlled vent to avoid condensation.
Cost. Expect a wide range depending on size, type and frame material. Fixed panels are the cheapest; hinged units with bespoke frames are the most expensive. As a rough guide, a single secondary glazing unit for a typical sash window sits in the low hundreds of pounds, with larger or more complex units costing more. Always get a survey and a fixed quote rather than relying on a rule of thumb.
How It Compares With Other Measures
Measure | Draught reduction | Heat loss reduction | Reversible? | Relative cost |
Secondary glazing | High | High | Yes | Medium to high |
Insulation film | Medium | Medium | Yes | Low |
Brush/compression seals | High (draughts only) | Low | Yes | Low |
Medium to high | Medium | Yes | Medium to high | |
Full replacement | High | High | No | High |
Secondary glazing is the strongest single measure for a period window that must keep its original frame. It is not cheap, but it is reversible, it does not change the outside of the building, and it addresses both draughts and conducted heat loss at once. If you can only do one thing to a cold period window and replacement is not an option, this is usually it.
Pro Tip If you are fitting secondary glazing to a sash window, ask the installer to leave the original sash operational behind the unit. That way you keep the option of opening the window in summer without removing the panel.
Step 6: Window Insulation Film for Old Windows
Window insulation film is a clear sheet taped to the frame and shrunk tight with a hairdryer. It is cheap, fast and surprisingly effective on single-glazed windows.
It works best as a short-term fix for one room, or for a window you never open. It is not a long-term answer.
Use it on the worst window in the house while you save for a proper solution.
Step 7: Internal Shutters for Insulation and Comfort
Internal shutters are the upgrade that does the most for a period home.
Unlike film or temporary seals, shutters are made to measure for your windows.
At Caledonia Shutters, we design and fit made-to-measure shutters across Scotland, from city centre flats to remote Highland homes.
Shutters also give you privacy and light control on street-facing windows, which is why so many of our customers choose them over blinds.
Pro Tip Fit shutters to the coldest, most-used room first. A living room or main bedroom benefits far more than a spare room you rarely heat.
What Most Guides Get Wrong
Sealing a period window is not about making it airtight. It is about controlling where the air goes.
Old buildings need some ventilation to manage moisture. If you seal every gap and block every vent, you trap damp air inside. That damp finds cold surfaces, and cold surfaces grow mould.
The right approach is simple:
Seal the draughts that make rooms uncomfortable
Keep existing vents and trickle vents clear
Never block a chimney or air brick as part of draught-proofing
Check for condensation after sealing, and adjust if you see it
Do the diagnosis properly, match the seal to the gap, and choose reversible options in older and listed properties.
Frequently Asked Questions
Can you draught-proof period windows without replacing them?
Yes. Draught-proofing is designed to work with original timber frames, not against them. Brush or compression seals, self-adhesive strips, and caulk tackle air leakage at the meeting rails, opening edges, and perimeter gaps. Secondary glazing and internal shutters add a further layer without touching the existing joinery. The key is choosing reversible methods that preserve the window's character and avoid trapping moisture, so the timber stays sound.
Do internal shutters help keep a room warmer?
They do. Internal shutters for insulation create a still air pocket between the glazing and the room, which slows heat loss through the window. That barrier also cuts cold air radiating off the glass on winter evenings. Made-to-measure shutters fit the reveal tightly, so there are fewer gaps for draughts to slip past. For period properties, they add warmth without altering the external facade or original window structure.
Is secondary glazing suitable for period windows?
Secondary glazing for period windows is one of the most effective upgrades because it adds a second pane inside the reveal, creating an insulating air gap. It suits sash and casement windows alike and is removable, so it does not permanently alter the original frame. Listed buildings usually need consent for external changes, but internal secondary glazing is often acceptable. Check with your local planning authority before installing.
How can I tell whether a window draught is coming from the sash or the frame?
Run a lit incense stick or a thin strip of tissue slowly around the window on a windy day. If the smoke or tissue flutters at the meeting rails or along the sliding channels, the draught is coming from the sash. If it reacts at the outer edge where the frame meets the wall or the opening edge, the frame or perimeter gap is the culprit. This tells you which seal to use.
Cold rooms in old houses are usually a draught problem, not a heating problem, and the fix is often simpler than people expect. At Caledonia Shutters, we make made-to-measure internal shutters that add a real barrier against the cold, with fair and transparent pricing and an in-house fitting team that covers all of Scotland. Book a free measure with Caledonia Shutters and get your period windows warm before the next cold snap.
Book Now!


Comments